First, I want to introduce you to Prairie Moon Nursery- my favorite source for native seeds and plants. One of the most wonderful things about this catalog, aside from the large diversity of seeds, is how informative it is. Here is this year's catalog.
I ordered 24 species of native plants and they sent me 1 Free packet of Common Milkweed, which is great because I don't have this growing AND I understand the Monarch butterfly population has declined upwards of 80% in the Midwest due to some not-to-be-named genetically modified agricultural crops. How horrible!
I want more Milkweed and Asters because they provide both larval and adult food.
Here is my seed list
Textile Onion Pussytoes Poke Milkweed Tall Green Milkweed Oval-leaf Milkweed
Prairie Milkweed Whorled Milkweed Spider Milkweed Arrow-leaved Aster Silky Aster
Short's Aster Hairy Wood Mint Cream Gentian Stiff Gentian False Meadow Rue
Button Blazing Star Dotted Blazing Star Northern Blazing Star Pale Spiked Lobelia
Bradbury's Monarda Wild Blue Phlox Old Field Goldenrod Purple Meadow Rue
Northern Dropseed
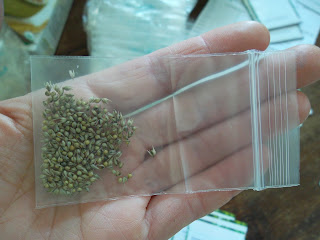
Each packet varies in the number of seeds contained, but all are $2.00 each, which is really cheap for rarer plants. On the back it tells you the approximate number of seeds. They look like this:
Some are additionally packaged in little cellophane or plastic baggies like Northern Dropseed here:
1. Label all of your bags with the name of the contents. I wrote both the abbreviated scientific name and common name, today's date and the number of days the seed needs to be in the fridge (30 or 60). I sorted the bags into 2 piles so that I could easily pull out the 30 day bags first.
3. Empty the contents of the seed packet into the corresponding bag and give it a shake.
4. I added 2 teaspoons of water to each bag. You want it moist, but NEVER wet so the seed doesn't mold. Push the air out and seal it up. A ready bag looks like this:
Asclepias hirtella is Tall Green Milkweed
30 = number of days in fridge
5. I put all of the baggies in a used cereal box and plopped it in the veggie crisper of the fridge. Mark your calendar so after 30 days you can take out the first set of baggies to begin starting them. I'll update what to do when they come out of the fridge on a later post.
Seeds in the box and ready for the fridge.
Let me show you an example page of how informative this catalog is. I use these tables to help pick out what I wanted to grow. I started by focusing on what could grow in either "Woodland" or "Savanna"
This catalog gives you the scientific name, a common name, the germination code so you don't have to figure out for yourself, amount of sun, amount of moisture required, flower time, color of flower, height, wetland codes, and more- like whether their is a picture in the catalog, what wildlife likes it, if it is good for landscaping or aggressive, etc. It is loaded with useful info.
I hope this helps someone. Also know that they sell bareroot plants if you don't want to start with seeds. They also have trees, shrubs, vines, other grasses, ferns, etc.
Happy Winter Gardening!


No comments:
Post a Comment