Saturday, January 14, 2012

Starting seeds that require stratification

I got another gift of plants for my birthday this winter and decided to spread the love thinner (more plants for less money) by buying seeds. I have several beds that receive part sun that need more plants and every spring I'm disappointed that I didn't start more native plants in winter. Most native plants need to go through stratification in order to break dormancy, so they demand you plan ahead. This cold and moist period usually ranges from 30-60 days, but can be more. All of the seeds I purchased were in this range. What does this look like? I'm going to walk you through what I've done today.
First, I want to introduce you to Prairie Moon Nursery- my favorite source for native seeds and plants. One of the most wonderful things about this catalog, aside from the large diversity of seeds, is how informative it is. Here is this year's catalog.

I ordered 24 species of native plants and they sent me 1 Free packet of Common Milkweed, which is great because I don't have this growing AND I understand the Monarch butterfly population has declined upwards of 80% in the Midwest due to some not-to-be-named genetically modified agricultural crops. How horrible!
I want more Milkweed and Asters because they provide both larval and adult food. 
Here is my seed list
Textile Onion     Pussytoes     Poke Milkweed     Tall Green Milkweed     Oval-leaf Milkweed     
Prairie Milkweed     Whorled Milkweed     Spider Milkweed     Arrow-leaved Aster     Silky Aster
Short's Aster     Hairy Wood Mint     Cream Gentian     Stiff Gentian     False Meadow Rue 
Button Blazing Star     Dotted Blazing Star     Northern Blazing Star     Pale Spiked Lobelia     
Bradbury's Monarda     Wild Blue Phlox     Old Field Goldenrod     Purple Meadow Rue
Northern Dropseed

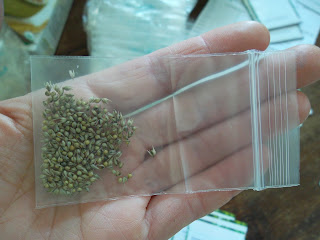
Each packet varies in the number of seeds contained, but all are $2.00 each, which is really cheap for rarer plants. On the back it tells you the approximate number of seeds. They look like this:

Some are additionally packaged in little cellophane or plastic baggies like Northern Dropseed here:

How I stratify seeds
1. Label all of your bags with the name of the contents. I wrote both the abbreviated scientific name and common name, today's date and the number of days the seed needs to be in the fridge (30 or 60). I sorted the bags into 2 piles so that I could easily pull out the 30 day bags first.

2. To each bag add a little sand. I think this is builder's sand. It was what we had on hand. I don't think the kind matters. I have also used vermiculite, which works fine too.
3. Empty the contents of the seed packet into the corresponding bag and give it a shake.
4. I added 2 teaspoons of water to each bag. You want it moist, but NEVER wet so the seed doesn't mold. Push the air out and seal it up. A ready bag looks like this:
Asclepias hirtella is Tall Green Milkweed
30 = number of days in fridge

5. I put all of the baggies in a used cereal box and plopped it in the veggie crisper of the fridge. Mark your calendar so after 30 days you can take out the first set of baggies to begin starting them. I'll update what to do when they come out of the fridge on a later post.

Seeds in the box and ready for the fridge.

Let me show you an example page of how informative this catalog is. I use these tables to help pick out what I wanted to grow. I started by focusing on what could grow in either "Woodland" or "Savanna"
This catalog gives you the scientific name, a common name, the germination code so you don't have to figure out for yourself, amount of sun, amount of moisture required, flower time, color of flower, height, wetland codes, and more- like whether their is a picture in the catalog, what wildlife likes it, if it is good for landscaping or aggressive, etc. It is loaded with useful info. 

I hope this helps someone. Also know that they sell bareroot plants if you don't want to start with seeds. They also have trees, shrubs, vines, other grasses, ferns, etc. 

Happy Winter Gardening!

Wednesday, January 11, 2012

Seeds and Progress Reports

I placed several seed orders yesterday. The first order was through Baker's Creek Heirloom Seeds which was mainly my tomato order (thanks for the holiday present parents!). The second order was through Prairie Moon Nursery- a native seed & plant company (thanks for the birthday present hubby!). I'm hoping to expand my native plant population and I have some newer beds that need some part-shade plants. Since most native seeds need to go through stratification (a 30+ day cold/moist period) in order to break dormancy I need to get those in the fridge as soon as possible, since it doesn't look like I can rely on these "winter" conditions to take care of this process. And lastly, I made a plant and seed order through Select Seeds, which focuses on heirloom flowering plants. I will post my seed lists as they arrive. So, what to do with all of these seeds? I thought I'd share how I organize them. I've done many things, but this method just seems to work for me.
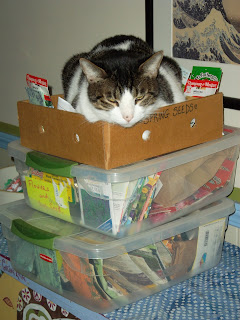
Chuy demonstrating my madness.
As you can see I have lots of seeds already. They are organized into 3 boxes: box 1 labeled Spring Seeds. Box 1 includes seeds to be planted in fall as well or seeds that need to be stratified or perennials that need to be started early and of course the usual spring/fall crops- peas, kale, spinach, lettuces, onions, etc.
Box 2 is Flowers and Herbs. Within this box I have dividers made of cardboard or index cards that separates annuals, perennials, vining flowers and herbs.  Box 3 is Summer Veggies with seeds categorized by likeness- all varieties of beans together for example. 
These boxes work well for seed packets, but each year I collect more and more of my own seeds in various containers so the boxes get a little less organized each year. 

Starting Seeds
I've begun starting seeds for the season. I'm trying something new this year. While I've always purchased a soilless mix to start in I've decided to try and start my garden seeds in free compost this year. My chickens make amazing compost. The only initial downside I've observed so far is that there are some seeds germinating that are of unknown origin. So- I will be getting some surprises in with what the labels indicate. 
tofu tubs make good starter containers

Started: leeks, parsley, wild ageratum, wild hydrangea, tronchuda cabbage, perpetual spinach, dinosaur kale, Skippy violas, White Hollhocks.
Chilling under the windowwell cold-frame: McKana Giant Columbines, Swamp & Butterfly Milkweed and Reugen & Soul (white) Alpine Strawberries. 

Seed Thievery 
There's an old house along the main street in town with wonderful hollyhocks. One holly crossed the road and planted itself in the rocks at the ice cream parlor. I admired the tall white holly all summer. When the store was nearing closure for the winter we went in for an ice cream and I stole seeds from that plant- gently wrapping them up in my napkin and forgetting about them in my car. A couple of weeks ago I rescued them from my car, soaked them overnight and plopped them in some compost and here we go. It will be interesting to see if they all bloom white or if they were able to cross-pollinate with the hollys across the street.
Hollyhock babies.

Progress Reports
#1: Window Farm. While it was fun I'm not overly impressed with the garden tower in the kitchen. This project was my version of the hydroponically-based "window farms" you can find directions for online. They are in an east window but are still generally lanky and not very productive. You just can't beat growing things outside. Imagine that? 
Top tier: spinach seedlings. Middle: parsley. Bottom: spinach transplants.

#2: Overwintering Marine Heliotrope- very successful and it has bloomed twice and smells amazing! This one is in the southern window of my kitchen.
Heliotrope

#3: Plectranthus cuttings & cabbage experiment: The plectranthus cuttings have been in the same container, with water top-offs, dead leaf pruning and flower pinching all winter long and are doing wonderfully. These are also in my south kitchen window. I'd never buy these again. They are WAY too easy to keep- whether as a plant in a container with minimal light & water or as cuttings. 
I noticed my cabbage had baby roots on it about a week ago so I stuck it in some water- the roots are growing, the leaves are growing back and there are new buds sprouting too. Just for fun. 

#4: Growing cilantro from seed indoors in winter: thin and lanky- not expecting much to come of this

That is it for today. The office kitty (Tabatha) says it's time to say good bye. 

Saturday, January 7, 2012

First Seeds Arrive!

A brief run down of my first seed order of the season- compliments of a present from Dad. All from Pinetree Garden Seeds. Time to get some seeds started!
Spring seeds
Reugen Alpine Strawberry
White Soul Alpine Strawberry
McKana Giants Columbine
Fakir Parsley Root
Orach- Rose
Spinach Mix
Salsify- Sandwich Island Mammoth
Gilfeather Turnip
Lettuce- Winter Density
Pinetree Lettuce Mix
Leek- Large American Flag
Kale- Dinosaur
Cabbage- Tronchuda
Yu Choi Sum Green
Pea- Cascadia
Pea- Sugar Sprint

Summer seeds
Asparagus Pea
Basil- Siam Queen
Thyme- Magic Carpet
Ageratum- Red Sea
Pepper-Marconi Red
Amaranth- Elephant Head
Mina lobata (vine)
Milkweed- Red Swamp
Milkweed- Butterfly weed
Snapdragon- White Rocket
Lemon Monarda
Marigold- Sophia Mix
Cosmos- Daydream
Black Eyed Pea

Friday, January 6, 2012

Climate Strange

Just a pictorial view of the day. It's my birthday. It's January 6th and it is 68 degrees outside. It's officially Climate Strange. I got to hike and work in the yard today AND I got very warm and had to strip down to my tank top. Ridiculous. Views of the day:
 Nero Kale. Made some awesome Kale, Pumpkin and Tofu lasagna for dinner last night with this gem of a plant.

Overwintering Rosemary. Window overhead. Concrete blocks behind and old afghan to wrap up with on cold nights.  Not pretty.

Brussel Sprouts looking good.

Alpine Strawberry- planted itself in the concrete block hole. Must plant more of these lovelies, including in the landscape.

Marjoram NOT happy with the nights in the teens and 20's. (front right)

Deformed turnips- grown too close together. Still very tasty.

Witch Hazel in bloom.

Garden Companion 1- Smokey illustrating the use of cardboard to keep weeds out of the paths.

Companion 2- Kiki. Notice the blanket to protect the green onions. 

Today's Hike: Stemler Woods
Rattlesnake Master

Sycamore bark is so cool.

Liking the lichen.

Shelter me.

Green with envy.

Who's there?

Happy 2012 everyone!